Sunday, 29 October 2017

Halloween Recipes: Intestines

The next ghoulishly delightful Halloween feast menu item this year is INTESTINES. 

It's pretty easy and straightforward.  Find some intestines.  Done.

Just kidding, this witch likes intestines well done.  So there's a little more involved than that.

Take some puff pastry.  And thaw it out.


Roll it out slightly, and then cut it into ribbons.


Lay the ribbons end to end and press the ends together.


Fill with sloppy joe filling (I made mine the day before to make the whole process easier).  Then pinch shut.


Transfer the long tube pinched side down onto a parchment-lined cookie sheet and shape into a general intestine shaped - um - arrangement.  Is arrangement the right word here?  Sure.  Arrange the tube like an intestine.


Brush with an egg wash and bake until the puff pastry is flaky.


Then serve.  With salad!  And maybe Rotted Hair, Brains, and Blood Clots.


Now - I'm not going to give you too much here but an overview recipe.  The filling is pretty much your call.  But I like the sloppy joe filling because it's a little bit more on the gruesome side. 

Remember not to overfill the pastry because it will be hard to pinch closed. 

I used the recipe that the lovely folks at Fabulessly Frugal recommended, but feel free to use one that you have if you love it.  You can find the recipe here.  It was easy to whip together, but I may use something slightly different next time.

Happy Halloween - keep your witches and ghouls safe out there and I hope they have loads of fun.

xoxo - Heather

Saturday, 28 October 2017

Halloween Recipes: Rotted Hair, Brains, and Blood Clots

Oooooohhhhhh   DOLLY!  Halloween COMETH!!!

I've always loved Halloween - the anticipation of wearing your costume, the costume parade at school, going out trick or treating.

As a kid, I would go until my hands and feet nearly froze off.  lol

And my Mom.  She HANDMADE our costumes.  I should see if she can find some pictures from over the years.  It would be awesome to share with you.  Back to my point.  She handmade our costumes and always made them to fit over our winter coats and ski pants - cause that's what we do in Canada - and they were so amazing that the costumes we buy now are terrible compared to her. 

I remember it always being SO COLD (we're talking -20 degrees C here)  and always SO MUCH SNOW.

My parents could barely contain their joy when they decided I was old enough to go by myself with friends.

And the decorations.  People would decorate like CRAZY.  One house I went to had a coffin on the step, and when we got halfway up the coffin SPRANG open and a real person dressed full on MUMMY jumped out!  It was awesome.

And now that I'm older - well, I still love dressing up for Halloween when I can.  I love asking my friends what their kids have decided for their costumes.  I love the calls of "Trick or TREAT!" at my front door.  The littles are always so excited.

Enough about that - let's talk food!

The first recipe I wanted to share with you is Rotted Hair, Brains, and Blood Clots. 

Sounds delicious doesn't it?

It's a popular dish with all the witches and devils. 

Here's what you'll need.


In a large pan (make sure it's big and deep!), heat the olive oil on medium high heat.  The add the garlic.


Add the tomato paste, cook, and add the cherry tomatoes, white wine, water, and red pepper flakes.


Cook the pasta until almost al dente - keep 1/2 cup of the pasta water - and drain the pasta thoroughly.

While the pasta is cooking, add the shrimp to the pan, cook for 2 to 3 minutes or until almost cooked through.


Then throw in the pasta.


And butter.


And lemon zest and lemon juice.  Add in half the reserved pasta water and cook until the pasta is thoroughly coated and the shrimp are cooked through.


Stir in half the basil, serve with additional basil as a garnish.


Be prepared, squid ink pasta isn't like regular pasta - it's much more salty and has a unique taste that's kind of hard to explain.

Lemon, shrimp, and basil complement and brighten the flavour of the pasta.  Keep it simple.

A delicious and simple dish that is even little witch approved!

Though I do have to tell you that when I was talking about this at the gym, my friend's little guy was VERY upset (I was scaring him!  I felt AWFUL)...  I had to run after him in the parking lot to tell him that I was only pretending.  But it definitely left an impression.

I hope your kids aren't making last minute mind changes about their costumes and that they're excited!  Do you think they'll like rotted hair for dinner?

Enjoy!

Squid Ink Linguine with Shrimp and Cherry Tomatoes

12 ounces squid ink linguine
1 pound raw shrimp, peeled and deveined
2 Tablespoons olive oil
4 Tablespoons butter
6 cloves garlic
10 ounces cherry tomatoes
2 lemons
1/2 cup chopped basil
1/3 cup white wine (or dry vermouth)
2 Tablespoons tomato paste
1/2 teaspoon crushed red pepper flakes
Salt and pepper to taste
  1. Bring a large pot of salted water to a rapid boil. 
  2. Mince the garlic.  Halve the cherry tomatoes.  Zest the lemons to get 2 teaspoons of lemon zest.  Juice the lemons.
  3. In a large pan, heat 2 Tablespoons of olive oil on medium-high heat until shimmering.  Add the garlic and cook, stirring occasionally, for 1 to 2 minutes or until lightly browned and fragrant.
  4. Add the tomato paste and cook, stirring frequently, for 30 seconds to 1 minute or until dark red. 
  5. Add the cherry tomatoes, white wine, 1/4 cup water, and red pepper flakes.  Season with salt and pepper.  Cook, stirring occasionally, until the tomatoes are cooked and softened - 3 to 5 minutes.
  6. Cook the pasta until almost al dente.  Reserve 1/2 cup of the pasta water and drain the pasta well.
  7. While the pasta cooks, add the shrimp to the tomato mixture, season with salt and pepper and cook, stirring occasionally for 2 to 3 minutes until almost cooked through and opaque.
  8. To the shrimp mixture, add the pasta, butter, lemon zest, juice, and 1/4 cup of the reserved pasta water.  Cook, stirring frequently, for 2 to 3 minutes or until the pasta is thoroughly coated and the shrimp are cooked through.  If the sauce seems dry, gradually add the rest of the reserved pasta water to achieve a desired consistency.  Turn off the heat and stir in 1/4 cup of basil.
  9. Garnish with remaining basil as desired, and serve.

Tuesday, 17 October 2017

The Baked Brownie

The Baked Brownie.

This recipe came out in the cookbook Baked: New Frontiers in Baking and literally everyone was making it and talking about it.  I must have came across it like 40 times in different places.

Needless to say - it made a huge splash on food blogs in every corner of the internet.

Me?  I was a little slow on the uptake and behind the curve on this one.  Like almost 10 YEARS behind (since 'Baked' came out in 2008).  But - you know what they say, better late than never.

Here's what you're going to need.  I don't think I've ever used so many eggs in a brownie before.  Ever.


Start out by whisking together the flour,


the salt,


and the cocoa powder.  Then set it aside.


In a double boiler over simmering water, combine the dark chocolate,


the espresso powder,


And the butter.  Heat through and stir together until smooth.


Get the sugars together. 


And add them to the chocolate.


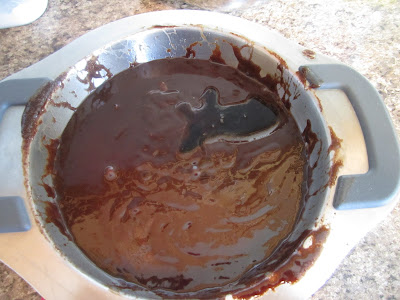
Stir the chocolate and the sugars together until combined and smooth.  Remove the bowl from the simmering water and allow to cool to room temperature.

Then add three of the eggs and whisk together.


Then add two more eggs and whisk together.


Add the vanilla and stir until combined - use a rubber spatula.  DON'T OVERBEAT.  It will make the brownies cakey.  And they won't be brownies.  (I think)


Then sprinkle the flour overtop. 


Fold the chocolate and flour together until just a few streaks of flour are visible.


Then pour into the prepared pan.


Bake for about 30 minutes, rotating the pan halfway through the bake time.


The result is a thick, dense, chewy, chocolate brownie with a little bit of a crackled top.


If you're a brownie fan, don't delay - don't wait 10 years to make these!  Just eat them!  I mean MAKE them. 

Also eat them.

Enjoy!

Wednesday, 4 October 2017

Mini 7 Layer Dip Bowls

Long time readers might remember these mind-blowing appetizers, Mini Spinach Dip Bread Bowls.  If they don't, they probably didn't make them.  BUT - PLEASE DO!  They are a delicious, fantastic, and impressive appetizer!  It's not too late to fall in love with them.

Later on, I found a recipe from the Picky Palate blog that was SIMILAR, but with 7 Layer Taco Dip.

It's delicious, and impressive, and well - that's it.  What more do you need?

The cast of characters is below.  Remember when I said "no store bought seasonings"?  Forget that.


Open up the tube of pizza dough.  (I can't help but sing that to the same line in Mable by Goldfinger)

Cut it in equal slices and press each slice into the bottom wells of a muffin pan.  Make sure you spray the pan with cooking spray.


Then bake.  I used the end of my lemon zester to make the dough cups a little larger - even after they were baked.


Next, combine the refried beans with taco seasoning.


In another bowl, combine sour cream with taco seasoning.


Next, start filling the cups each with 1 teaspoon of refried beans.


Add 1/2 teaspoon salsa.


Add 1/2 teaspoon guacamole.


1/2 teaspoon seasoned sour cream.


Then sprinkle on some cheddar cheese and chopped cilantro.


Serve to your mega-impressed guests and devour.


These were SO good!  Fresh and bright!  I would encourage you to add a little extra cheese.  And make sure you use the tiny holes on the grater!


Now - sure - these are an impressive appetizer....  But they are straight up a lot of tedious work.  And, because of the bread, I'm not sure how "in advance" they could be made without getting soggy.

I still think you should make them though.

Hop on over to Jenny's blog at Picky Palate to check out the recipe!