Friday, 23 February 2018

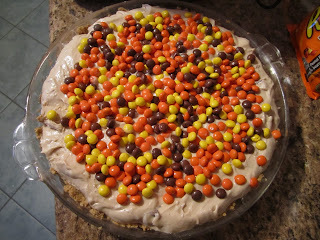
Peanut Butter Ice Cream Pie

I like to make ice cream pies in the dead of winter because it makes me think of summer.

I find it one of the most hilarious types of oxymorons.

Is it an oxymoron?  Not really.  What is that word?  

Whatever - I do what I want.  This is my blog.

So this ice cream pie.  Dayummmm girrrrrl - buckle your seatbelt.  It is UH-MAZING.

As with all ice cream things - this is a multiple day process.  It's not a ton of hands-on time, but it's a LOT of waiting.  

First things first, run and put the bowl of your ice cream machine into the freezer.  I ALWAYS forget to do this and then I'm ripping my hair out trying to figure out how to freeze the darn bowl.  Although if you have one of those mega-fancy ice cream machines with a compressor then you might not need to put the bowl in the freezer.

I digress.  First day, you're going to make the custard so that you can make the ice cream.


Not too many ingredients right?!  

In a sauce pan, combine the peanut butter,


the milk,


and the cream.  Start heating it through until it's combined.


Then, in a mixing bowl, combine the egg yolks,


With the sugar,


And whisk it together.  


Then, very VERY slowly, start whisking in some of the heated milk/cream mixture.  SLOWLY.  Don't just dump it in or the eggs will cook and you'll have to start all over again.  As you SLOWLY drizzle/whisk in the milk mixture, the eggs are going to warm up.  This is called tempering and once you figure out how to do it, it'll open up a whole pile of exciting things for you in the kitchen.


Once the eggs have been tempered, stir the egg into the pot on the stove.

Add in the vanilla.


Now you're going to cook the whole works over medium heat, stirring constantly until the mixture is super thick and coats a wooden spoon.


Now you have custard.  And it's totally glorious. (I LOVE making custard!)  Now this beauty is going to cool to room temperature and then set in the fridge overnight.


The next day, you're going to make the crust.  Now - the original recipe calls for Nutter Butter cookies, but we can't get them here in Canada, so I used these Pirate cookies and they were delicious.


Crush up the cookies in a food processor, stir in melted butter, and then press into the bottom and up the sides of a pie plate.


Next, you're going to start churning the custard into ice cream in your machine.  15 - 20 minutes in the machine should do the trick.  While the ice cream is churning, chop up some peanut butter cups into chunks.


In the last few minutes of churning, throw the chopped peanut butter cups into the ice cream machine.


Pour the ice cream into the peanut butter crust.  Then pop the whole works back into the freezer overnight.

I was gonna do all this fancy decorating - but I kind of forgot and then was super busy and just spread mini Reese's pieces all over the top of the pie.  Not a gorgeous piece of work - but fun!


When it's time to serve, pull it out of the freezer, let it sit on the counter for 10 - 15 minutes and then slice it up and feed it to someone you like.

But not your brother who "isn't really a fan of peanut butter desserts".  (this is a direct quote)  No peanut butter ice cream pie for him.


If' you're a peanut butter lover - you're going to FLIP for this ice cream pie. 

If you want to dial back the peanut butter flavour (but, I mean, why in the world would you want to?) you could do a graham cracker crust, or a chocolate cookie crust, or a vanilla cookie crust.  

Truth be told - the ice cream was so amazing and magical and smooth and creamy, that I would be happy just to eat it out of a bowl with a spoon and not even bother with the pie part.

And I wouldn't blame you if you didn't bother either!

Enjoy!
xoxo - Heather


Monday, 12 February 2018

Italian Love Cake

With Valentine's Day upon us, I could have featured a Red Velvet SOMETHING.  But it felt a little too easy.  (Let's be honest - I have quite a few Red Velvet recipes up my sleeve)

For many, many years I've been looking at recipes for Italian Love Cake.  But I've always been so hesitant, because - well - ricotta doesn't scream dessert to me.

But I decided to take the plunge and just give it a try.  

Plus - it turns out that it's SUPER cool.  Science.  You just wait and see!!

Here's what you'll need.


In a large bowl, combine the Ricotta (Loooootttts of Ricotta - and make sure it's whole milk ricotta),


And 4 eggs.


Sugar and vanilla.


And whip it all together with a hand mixer until smooth.


You'll need to prepare the cake according to the package directions.  Spread the batter into the bottom of a glass baking dish.

Make sure the baking dish you use is glass and deep - this is a big cake!


Then, carefully spread the Ricotta mixture over the cake batter.


Bake the cake for one hour and allow to cool completely before frosting.


Combine the milk and pudding and whisk until thickened.


Then fold in the Cool Whip.


Now - here's the SCIENCE part!!


The layers SWITCH PLACES.  How cool is that?! 

I mean - it's not as cool if you didn't know that was supposed to happen and you were just eating it as a guest...  But it was cool as heck for me!

Spread the prepared frosting on the cooled cake.  (I skipped this part so it wouldn't spoil the surprise above).


Thoughts?

I thought the icing was a light complement to the rest of the cake.  The ricotta was sweet and rich and the cake was really tender.  

I did find that it was a little on the "damp" side on the bottom of the ricotta - but I honestly can't remember if I got a chance to let it chill overnight or not.  Make sure you do that.  But it might need to be baked a little longer or have the ricotta strained slightly.


Just a gentle reminder that this cake is really rich - so just be prepared!

I hope you make this Love Cake for someone you love and that you all enjoy it as much as me!

xoxo - Heather


Italian Love Cake
1 package chocolate cake mix (and the ingredients need to prepare the cake)
2 pounds whole milk ricotta cheese
4 eggs
3/4 cup sugar
1 teaspoon vanilla extract
1 (5.1 oz) package instant chocolate pudding mix
1 cup cold milk
8 ounces thawed Cool Whip
  1. Preheat oven to 350 degrees F.  Spray a 9 x 13 inch glass baking dish with non-stick cooking spray and set aside.
  2. Prepare the cake mix according to package directions to the batter stage and spread into the prepared baking dish.
  3. In a large bowl, combine the cheese, eggs, sugar, and vanilla.  Beat with a hand mixer until smooth. 
  4. Carefully spread the ricotta cheese mixture over the cake batter.
  5. Bake the cake in the preheated oven for 1 hour.  Allow to cool completely before icing.
  6. After the cake has cooled, prepare the icing.  In a large bowl, combine the milk and pudding mix.  Whisk until the pudding has thickened.  Fold in the Cool Whip until well combined.
  7. Spread the prepared icing over the cooled cake.  Cover and refrigerate for 6 hours or overnight - it gets better the next day!

Tuesday, 6 February 2018

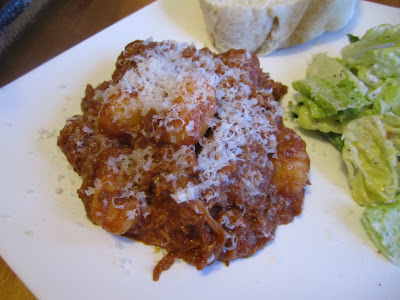
Gnocchi in Creamy Pork Sauce

Sometimes I struggle to decide on how to start a post.  

About how best to draw you in.

I'm sure you notice that there are long periods of time between posts.  Half the time it's because I have no idea what to say to engage you, the reader, and the other half of the time it's because I have no idea what I should post next, because everything I want to share with you is so good its hard to know where to start.

And here we are at the beginning.  How to start.

I figure if you're here, you probably don't mind the little tid bits and pieces I tell you and that you probably enjoy the recipes I share.

So I guess the truth is that - I can always start however it feels right.

I looked at this recipe many, MANY times after Michelle shared it on her blog.

Everything about it was right up my alley.

It starts with very few ingredients.


First, an evenly chopped onion.  Make sure the pieces are all the relatively same size, but it doesn't need to be diced.

Place the onions in the bowl of a slow cooker, add the minced garlic.


Then place the pork shoulder on top.  Michelle's recipe calls for a bone-in shoulder, but I could only get a boneless.  Either is fine.


Pour one can of the crushed tomatoes over top of the pork shoulder.


Sprinkle the Italian seasoning over top.


And salt and pepper.  I used 1 teaspoon salt and about 1 teaspoon pepper.


Cover with the second can of crushed tomatoes.


Cover and cook on low for 11 hours.

Yes.  ELEVEN hours.

I put this in at about midnight and then went to bed.  It was done about 11 am and then I shredded it and let it sit in the slow cooker on the warm setting until later in the afternoon.

Cause I was not about to get up at 5 am to start it.  hahahahahaha - never.

If you're concerned about food safety.  You could start it earlier in the evening so that it finishes earlier in the morning, and keep it in the fridge until a couple of hours before you want to serve it.  I would suggest setting it to warm to start heating (I worry about the bowl cracking if it's too hot) and then turning it to low after its warmed through.

About an hour before you want to serve, you'll need to add in cream and dried gnocchi.  I find this gnocchi in the pasta aisle.  There is a fresh-type gnocchi in the fresh pasta section at the grocery store.  Don't use that one.  It'll get too soggy.


Pour in the cream.


Stir in the gnocchi.  Cover and let cook on low for 1 hour.


When you're ready, serve with crusty bread, or garlic bread, or (EVEN BETTER) cheesy garlic bread, or soft buns.  Really whatever carb your heart desires.

And a Caesar salad - just to green things up.

Oh - and I totally recommend using parmesan cheese on top.


Oh kids.  You're going to have leftovers for DAYS.  This makes a HUGE bunch of food.

I would recommend making for a big bunch of company or for a potluck.

Considering that there is almost no spice in this dish aside from the garlic, onion, Italian seasoning, salt, and pepper - there is a ton of flavour.  And I have no idea where it comes from.  It's rich and complex and the meat is tender and both the gnocchi and pork kind of melt in your mouth.

And it was fantastic leftover.  I would even recommend cutting up crusty French bread and making an open sandwich with it.  That would be just a thing of glory.

One more thing before I go - freezing leftovers.  The pork will freeze beautifully, but the gnocchi gets kind of gross after its frozen.  Just something to keep in mind.

Enjoy!

xoxo - Heather