Thursday, 28 June 2012

Shrimp Burgers

I am so thrilled to share this with you today!

When I first saw this recipe on Tracey's blog Tracey's Culinary Adventures, I decided at once that I needed to make them.... 

Tracey's blog is an incredible cornucopia of delicious recipes that I can't wait to try.  She's an interesting and engaging lady and I wish I could post as much as she does!  She's a machine.

You really do an incredible job Tracey!

My parents LOVE seafood and they are more than happy to eat all the seafood I can throw at them. 

Every now and then I think about making something with beef (read: elk) or chicken, just for a change - but I don't think they really care.

Back to the burgers. 

When I read the recipe, I was really surprised at how little filler there was.  I had no idea how the burgers were going to stay together.


Here's what you do.

Put torn up bread pieces into a food processor and pulse until the bread is no more and becomes coarse crumbs. 


It turns out that this is kind of what panko bread crumbs are like.

Also - I didn't believe that one slice of bread would give me 3/4 of a cup of crumbs.  So I took out three pieces.

I decided I would process each slice of bread and dump the resulting crumbs into a 3/4 cup measure until I had 3/4 cup of crumbs. 

I only needed one slice.

That'll show me for doubting Tracey!

After giving the food processor bowl a quick wipe, put the shrimp into the bowl and pulse 6 or 7 times.  You want to have both finely chopped and chunks of shrimp.


Put the shrimp and the bread crumbs into a large mixing bowl.


In a small bowl, mix mayonnaise, green onions, parsley, lemon zest, salt, pepper and cayenne until well combined.  Then add this mixture to the big bowl with the shrimp and bread crumbs.


Gently mix everything together with a spatula.


Tracey recommends putting the shrimp onto a small baking sheet before it goes into the fridge - but I decided to do something a little different.


I got out a cutting board and lined it with parchment paper.

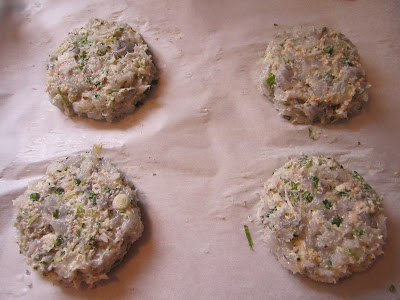
Then I used a 1/2 cup measuring cup to portion out the shrimp mixture.  I dropped the mixture in little 1/2 cup piles on the parchment paper and then used my hands to mold the mixture into patties - a little smaller than the diameter of the buns I was using. 

This mixture isn't like making a beef burger patty because it's quite delicate - so you don't want to handle it too much.

Then I cut the parchment paper into squares around the patties so that when I came time to fry the patties up I could just flip them into the pan and then pull off the paper.

It worked REALLY REALLY well.  I would absolutely do it this way over and over.

But before the patties get fried up, they need to be covered with plastic wrap (just loosely) and put in the fridge for anywhere from 30 minutes up to 24 hours.

When it's time to fry up the patties, heat the oil in a non-stick pan over medium high heat until the oil starts to shimmer.

Then flip the patties onto the the pan and peel the backing parchment paper off.  Just be careful because the hot oil WILL splash up a little bit.


Fry the patties until golden brown and crisp on both sides - about 4-5 minutes on each side (8 - 10 minutes total).

Also - the patties WILL hold together.  Don't be afraid because there's not a lot of filler - it just makes the shrimp stand out!

When I made these for a small crowd, I buttered and toasted the buns until they were golden and warm.

I served the burgers with tomato, onion, and lettuce for toppings and mayo, dijon, or ranch dressing for condiments.  I also had coleslaw and potato salad as sides.

I remember seeing a Baja Sauce for fish tacos that I think would be brilliant on these as well.

And what we thought? 


They were so unexpected and light and "bright" from the lemon zest.  They were so delicious I would make them for anyone who likes seafood.  And even though it seems a little labour intensive - it really doesn't matter because they were so worth every single bite.

My parents liked them so much that the following day, my Mom volunteered me to make them for 12 people.  12.  I kind of freaked out a little bit inside.  I've never fed that many people at one time!

Just so you all know - I did that recently and it went absolutely wonderfully.  Everyone enjoyed the food and we had a great time!

The only tiny little change I made was to reduce the lemon zest to 3/4 teaspoon - but that was just my personal preference.

Thank you so much Tracey for posting this ridiculously wonderful recipe and allowing me to share it here today!  I can't wait to try more!

This is the Cane Girl - signing off.

Saturday, 23 June 2012

Cadbury Mini Egg Cookies

Okay, okay - I know that Easter was, like, ages ago - but just bear with me!

I'm sure by now I've established that I looo.ooove Cadbury Creme Eggs, but I wanted to talk about that other Easter wonder - the Mini Egg. 

Poor Mini Eggs - next to Creme Eggs (in my opinion anyway), they're just an afterthought.  I'll eat 'em, but I wouldn't CHOOSE them.

But I know SOME.ONE who prefers Mini Eggs to Creme Eggs...  In fact, she thinks Creme Eggs are disgusting. 

This SOME.ONE may or may not be my Mom.

I might unfriend her from Facebook.

Hi Mom!!!!  *waves*

I thought about taking my chocolate chip cookie recipe and subbing in chopped up Mini Eggs for the chocolate chips. 

But then at the last minute I decided to just make them using the recipe that I had found.

Cause I'm crazy like that.

And I like doing what I want.

So - here's what you're gonna need.


The recipe says to CHOP the Mini Eggs - but the thought of chopping each individual egg and the frustration and anger that would most likely ensue ticked me off so I came up with a much more efficient way to get the Mini Eggs chopped.

I put them into a heavy duty zippy bag and took the bag outside and beat the ever living heck out of the eggs with a hammer.


It was really quite satisfying.

And efficient!

Whisk together the flour, salt, and baking soda.


Beat the butter on medium speed until smooth.

Add the sugars and beat another two minutes.


Then beat in the vanilla.


Then the eggs - one at a time - until combined.


On low, stir in the flour mixture gradually untill combined.


Remove the bowl from the mixer and stir in the Mini Egg bits by hand.


Drop the dough onto the cookie sheet using a handy dandy cookie scoop - but not one that's broken and you've been meaning to take it in to get fixed because it's broken but then you forget about it and when you do use it the darn thing is a pain in your rear end and you want to throw it through a window.

Definitely don't use that cookie scoop.  It always ends poorly.

This recipe says to bake the cookies at 375 degrees for 10 - 12 minutes.  I did try that - but then for the rest of the batch I lowered the heat to 350 degrees and baked the cookies for 10 minutes - I much prefer the way they came out of the oven.


They turned out to be REALLY good!  Although I didn't think the chocolate bits were terribly obvious - but the little bits of candy shell throughout the cookie was really great!


Wanna know how I KNOW they were great?  My Mom keeps sneaking them out of the freezer....!

This is the Cane Girl - signing off.

Monday, 18 June 2012

Mac & Cheese Mondays: Gnocchi Mac & Cheese

When I saw this on Tastespotting, my first thought was "HELLS. YEAH".

I don't often buy gnocchi, mostly because I can't get a smaller package that 500 grams.  If I could, I'd probably buy it more often.

So when I saw it and looked completely awesome - I couldn't hardly wait.  Usually, I find a recipe and it gets filed away and I often forget about the awesome recipes that I've saved....  I'm in the process of building an index to fix this problem, but it's going to take a while.

Instead of filing it away, I printed it off immediately and on my morning trip to the grocery store, I picked up what I'd need to make it.


Three cheese sauce and gnocchi.  Seriously - could life get any sweeter?

Start by cooking the gnocchi according to the package directions.


Then move on to the sauce.  Start by heating butter in a saucepan over medium heat.  Then add the onions and cook until translucent, about 3 minutes.

Then add the flour and stir until melted and bubbly.


Once bubbling, gradually add the milk and stir until thickened.


Then start adding the cheese a little at a time, whisking and melting the cheese before adding more.  Season with salt and pepper.  I think I used 1/2 teaspoon salt, and 1/8 teaspoon pepper.


Put the cooked gnocchi into a greased dish.  A couple of the other recipes I read said to make sure the gnocchi was in a single layer - but it really made no difference to me.


Then pour the cheese sauce over top.


Sprinkle with parmesan cheese, breadcrumbs, and parsley.


Bake at 375 degrees F for 20 minutes or until golden brown and bubbling.

Check the burnt cheese sauce - such a pretty picture.
I ended up leaving it in for 25 minutes and then let it stand for about 10. 


Yep, those are carrots and I had to show them to you.  Trust me - it's practically a miracle.  By this point it had been like 4 days since I'd eaten a vegetable of any kind. 

I might be getting scurvy.


*sigh*.  This was SO good.

Here were my thoughts.

First of all.  I am refusing in the future to buy those STUPID little containers of bread crumbs.  They always taste stale.  I can buy a loaf of bread and get much better topping.  Or use crackers.

Secondly, I thought I put too much breadcrumbs on top.  Most of it didn't brown and it seemed like too much.  I also could have cut down on the parsley.

Thirdly, I thought there was a little too much parmesan for my taste - I would definitely cut it down.

Last of all - you could seriously do any kind of cheese and this would be wonderful.  But if you like your mac and cheese really saucy, I would recommend doubling it up - I might next time.

Yum - what a delicious treat for a totally underestimated pasta!

This is the Cane Girl - signing off.

Friday, 15 June 2012

BUTTERBEER!!!!!


Now that I have your attention!  I honestly didn't mean to scream - it's just....  It's just.....

The amount of awesomeness that is about to follow cannot be contained in lower case letters.

When Mom and I went to Florida in 2010, we talked about going over to Orlando to Universal Studios to go to the all new Wizarding World of Harry Potter

That's right.  I said it.

Sadly, the park opened this new attraction about two weeks after we left Florida to come home to Canada.

*sniff*

So when we planned our trip in September of 2011, we decided on Orlando and the whole point was to go to Universal to see WWOHP!!! 

Oh, and hang out together.  That part was important too.

We had a fantastic 10 days in Orlando shopping and eating out and laying at the pool and just enjoying each other's company.

The best part of the whole thing though, was WWOHP.  Hands. Down.

The folks over at Universal did a totally fantastic job of paying attention to the smallest details.  Right down to the curtains in the windows over the roof tops of Hogsmeade, the sparkling snow, and the moving pictures throughout.

SO. COOL.

As a huge fan of Harry Potter - I was not disappointed in the slightest.  It was incredibly magical. 

Here are some pictures!


Hogsmeade


The Castle was fantastic.  The turrets, the rocks, the inside.  All of it.

And there's so much more.

They really thought of everything.  No matter what side you look at it from - they missed NOTHING.

As for yummy treats.  Well.  It wouldn't be "Harry Potter World" without Butterbeer.

When designing the attraction, Universal met with J.K. Rowling and went over everything from the design of the place, to the buildings, to the food, to the souvenirs, and the Butterbeer.

It turns out that when Universal was "designing" the recipe for Butterbeer, they got J.K. Rowling's approval on the taste and the texture.

You can buy Butterbeer at the Three Broomsticks, at the Hog's Head Inn, and at carts throughout the park.


You can buy it either "regular" or "frozen".

I liked the "frozen".  Lots.  I wanted to drink LOTS of it.  I wanted to set up a chair beside the Butterbeer cart and hold out my cup when it was empty, have it re-filled, and just sit there and watch the people go by.

Plus, it was like four thousand degrees.


Of course, because I'm an idiot, I never did take pictures of the full cups of Butterbeer before diving in.

Duh.

Anyway, Butterbeer is a sweet, buttery drink topped with a foam that sort of kind of doesn't melt.  It's hard to describe..... 

Before I went to WWOHP, the sweetest Darla over at Bakingdom posted about HER trip to WWOHP and I was totally jealous.  Totally and completely.

Darla is too awesome.  I am constantly amazed and inspired by her creativity and attention to detail.  She seems to be able to perfectly manifest her imagination in cakes and treats - a skill and quality I'm totally jealous of! 
Then she posted a recipe for Butterbeer and I nearly died.  

Of course, the only thing I could get in Canada was the whipping cream.

That's it.

So my dreams of drinking Butterbeer had to be put on hold.

Then Mom and I went to Florida.  And I came home with so much stuff I had to buy a second suitcase. 

For real.  I kind of lost my head.

One of the things I HAD to bring back was Imitation Butter Flavouring.  Which is absolutely essential for this recipe and something I'd never even heard of.  But I found it - and I bought copious amounts of it. 

Then one of the guys I work with brought me back a case of A&W Sparkling Vanilla Cream Soda from the States.

Then everything sat in my pantry.

Then I got around to it. 

Am I ever glad I finally did.

Imported pop

Imported flavoring

You'll need all this

Start by whipping the whipping cream a little until it starts to thicken, then add a little sugar and continue whipping.


Then add the vanilla and butter extracts.


Then whip until stiff peak stage.

In a glass, preferably a special Butterbeer glass that you bought when you were at WWOHP, put in a little butter extract.  But if you don't have a special Butterbeer glass from WWOHP, just a regular old tall glass will do.

If you're into that kind of thing.


Then pour in the cream soda gently into the glass - try not to let it foam up.


And top with a dollop of the whipped whipping cream.  You could do this however you'd like - just plop it on, or pipe it on with a bag so it's pretty.

I just plopped it on and then prettied it out a little with the back of a spoon.


And enjoy!  Maybe with a Butterbeer Cupcake? 

Yes, please. (stay tuned for that one!)


I would have to say that it's REALLY. REALLY. close to the one at the park.  Like almost exactly the same.

Oh. So. Good.

The only thing left to do is figure out how to make the frozen version!

Thanks to Darla for being totally obsessed with Harry Potter!  You're wonderful and I love reading your blog!  Keep up the amazing!!!!

Now pardon me while I jump for joy and sing Darla's praises!!!

This is the Cane Girl - signing off.