Friday 30 January 2015

Sugar Pie

Last year at Christmas, we got this mailer from the City with Christmas activities, traditional stories, and recipes.

Being a very busy person - I skimmed it and set it aside.  When I was doing a clean-out of my little "box of miscellaneous papers" (like 8 months later), I came across the mailer, skimmed it again, and found this recipe. 

To be honest, my thought process was like this:
"Oh yeah, I forgot about this recipe"
"Should I make it this weekend?"
"I kinda want to make something else"
"But I want to clean out this box"
"It's waaaaaay too much work to scan it and save it somewhere for later"
"I'll just make it this weekend"
"Crap, I don't have a 9-inch tart pan.  Whatever"

Reading the recipe over, it looks somewhat intimidating.  But, don't worry - it's pretty easy!

 
Start out by making the dough.  You'll want to do this fairly in advance because it needs to be refrigerated for an hour and then hang out on the counter for 20 minutes afterwards.
 
In a medium bowl, add the flour.

 
Then the sugar.

 
And the salt and cold butter.

 
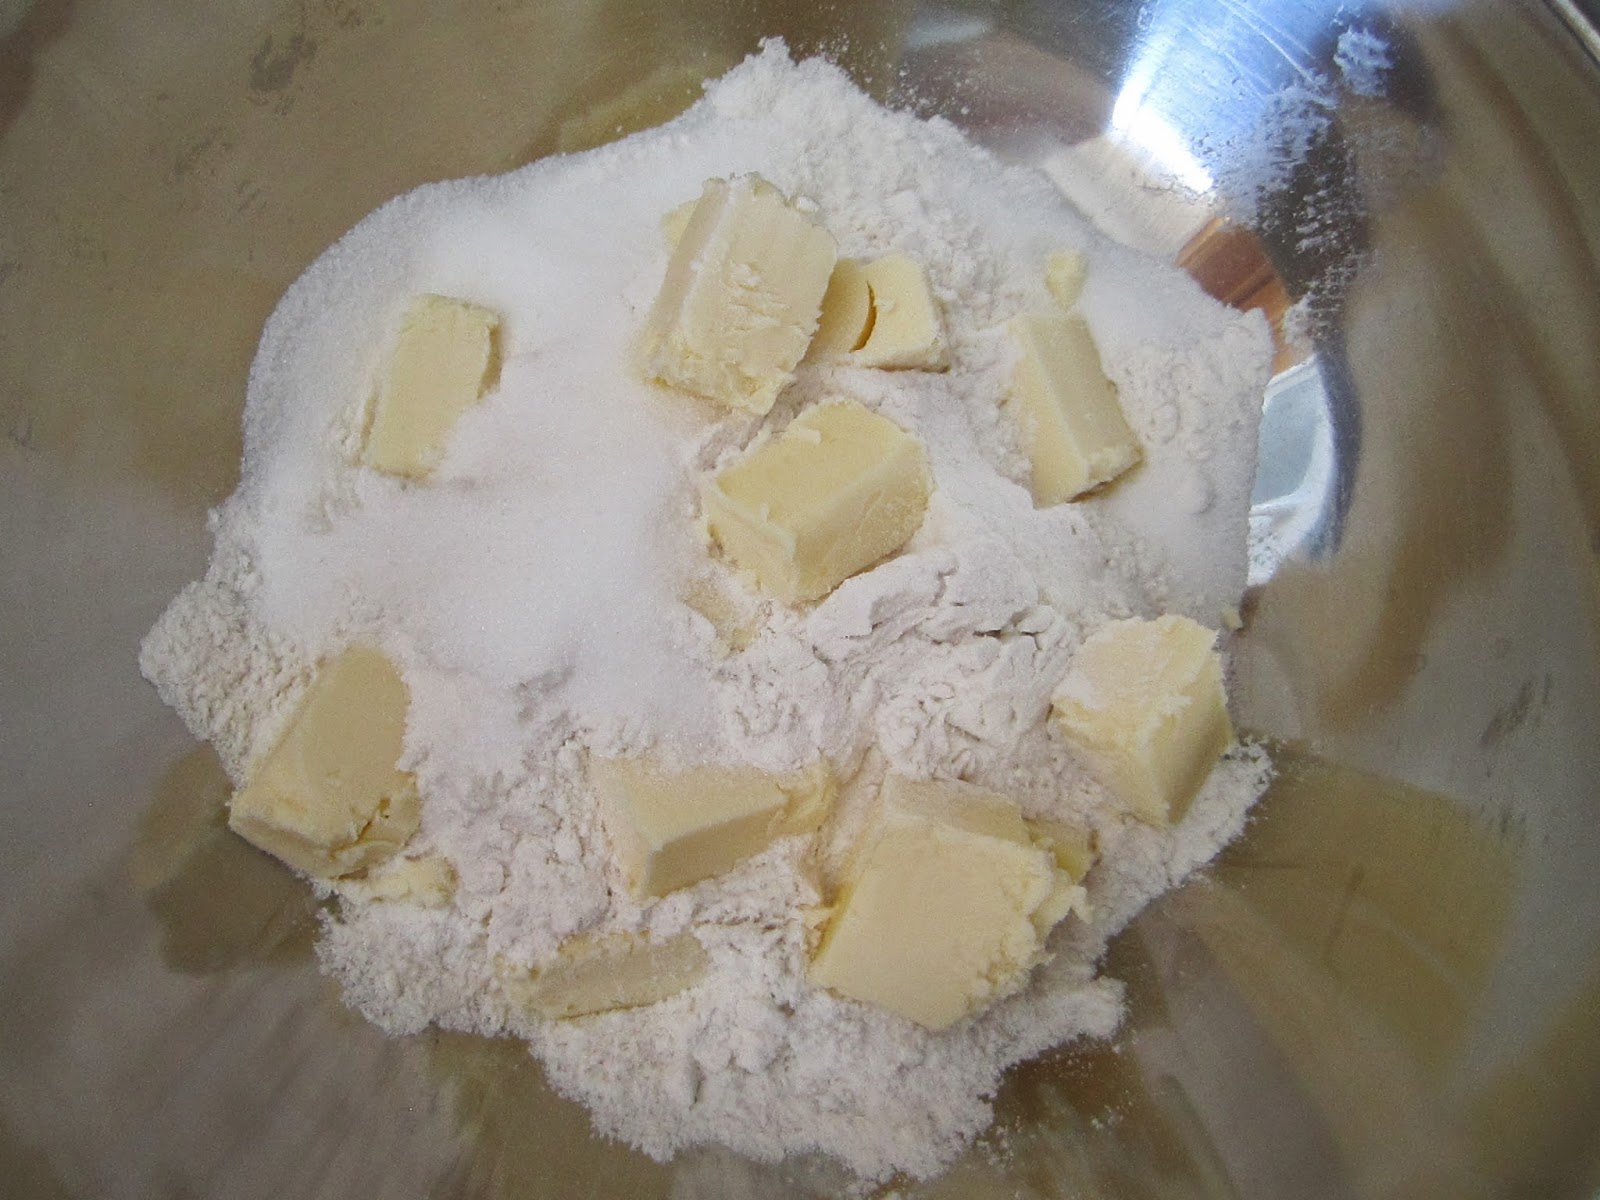
Combine that using a pastry blender.  Or a fork.  Or two knives.  But I prefer the pastry blender.
 
Then, combine milk and an egg yolk and pour over the flour mixture.

 
Stir the mixture together using a fork (NOT a pastry blender) until it's kind of a shaggy dough.

 
Dump the mixture on the counter and knead until combined.  Don't overwork the dough or it will be tough.
 
Then press into a discy-shaped circle thing, wrap in saran-wrap, and put in the fridge.

 
After chilling in the fridge for 1 hour, take the dough out and let it sit on the counter for about 20 minutes.
 
Roll out the dough into a circle just slightly bigger than a 9-inch tart pan.  You want to be able to press the dough up the sides of the pan and have a slight "hang-over" that you'll trim off.
 
Because I don't OWN a 9-inch tart pan, I used a pie plate and the same method.

 
Then take a fork and prick little marks in the dough.  You don't want to press all the way through the dough, just kind of make an indentation.
 
And then line the dough/shell/pastry with aluminum foil and pie weights (or dried beans work too!) and bake until golden.
 
I skipped that part because I don't own pie weights either.  And I don't keep dried beans in the house.

 
Next up?  The filling.

 
In a large bowl, combine the flour,

 
The brown sugar,

 
And the two eggs.

 
And whisk it all together until really smooth.
 
Take a sec and look at how beautiful that is..... 
 
My.  Goodness.

 
While you've been mixing up the gloriousness above, you'll be heating the cream to a boil.
 
Right?
 
I didn't tell you that?
 
Oh boy.  Sorry.  Heat cream until just boiling.
 
Then SLOWLY pour the hot cream into the brown sugar mixture.  If you pour the cream in too fast you'll cook the eggs and, trust me, it's super-gross.  Pouring the hot cream in slowly tempers/cooks/creates magic and keeps the eggs from cooking. 
 
Once you've got about half that hot cream in the bowl, you can just dump the rest of the cream in.  It's most likely gonna be safe.

 
Then you'll pour the sugar/cream mixture through a sieve (to remove any clumps - it can happen).  You can pour it directly into the crust, or into another bowl and then pour the strained mixture into the crust.  Totally your call.


Then bake in a preheated oven until the center is firm. 

 
Let cool on the counter and serve!
 
Preferably with whipped cream. 
 
Okay - ALWAYS with whipped cream.

 
Let me just say.  For a pie with almost next to nothing in it, it was delicious!!
 
Sweet, creamy, and a beautiful crust - this old-fashioned pie absolutely won my heart!


The other day my Mom and I were talking about pecans.  She doesn't like them.  (I was making Sex in a Pan for dessert and she asked me to switch out the pecans for almonds)
 
It completely threw me for a loop as one of my favorite pies is pecan!  But Mom doesn't like pecan pie.  Well.  She likes everything about pecan pie - except for the pecans.
 
The moral of the story is that if you know a crazy person who likes pecan pie without the pecans - I would absolutely recommend this as an acceptable substitute.
 
Or you could make a different pie.  Totally your call.
 
Anyway.  Yeah.  This pie was FANTASTIC!  And I fed it to as many people as I could and they all loved it.
 
I also kind of love the look of the crust like this.  It's super-pretty.  I'm tempted to NEVER use a tart pan ever.
 
I hope you get a chance to feed it to your peeps.  And maybe to someone who doesn't like pecans.
 
xoxo - Heather 

Tuesday 27 January 2015

Cream Cheese Lasagna

I'm always intrigued by variations of lasagna.  I mean - I make my Mom's lasagna and it's delicious every time.  I'm sure it's the same for you.
 
But everyone's lasagna is different than everyone else's.  And everyone claims that theirs is best lasagna in the world.
 
And I have no doubt that it's true.
 
I rolled upon this recipe on Pinterest and Sommer, during a visit with her husband's family, discovered that her Mother-in-law uses CREAM CHEESE instead of ricotta or cottage cheese in her lasagna!
 
I know. 
 
But why not?


Sommer's recipe actually calls for sausage, but I'm not terribly fussed on sausage, so I just used ground beef.

Okay - there's clearly spices in there.  But I have no idea what they are.  Sorry about that. I'm pretty sure I just used some garlic salt. 

Or something.  My bad.  But because I used ground beef instead of Italian sausage it needed a little flavoring.  Use your judgement.

 
After the beef is cooked through, pour in the marinara sauce and let simmer.  I suggest using a really big skillet.  I clearly need one.

 
Cook and drain lasagna noodles, I used 12.  Lay the noodles flat on a clean tea towel.
 
Evenly divide the cream cheese and spread on each noodle, covering as much of the noodle as possible.

 
Then assemble.
 
And bake.
 
And I would say that it needs to stand for 15 - 20 minutes or so.
 
 
It is wildly cheesy and creamy.
 
The cream cheese adds a sweetness and tang that's kind of unexpected, but completely delightful!

 
Okay - so granted, these pictures make this dish look like a hot mess.  And does Sommer about zero justice.
 
But trust me when I say that it is AMAZING!!. Creamy, cheesy, saucy - just a delicious dish.  Next time I would top it with sweet basil instead of Italian Seasoning - but that's just my personal preference.

  
Run over to see Summer at her blog and try her delicious lasagna!

Source:  A Spicy Perspective

Friday 16 January 2015

Buttery Soft Dinner Buns

It took me a LOOOOOONG time to be comfortable working with yeast and understanding how it worked.

I read article after article, recipes, tips, you name it.  But what really helped were the step-by-step picture tutorials that people would put up showing what yeast should looked like when it was proofed, how "doubled in size" should look, everything. 

Darla over at Bakingdom put up this tutorial and it helped SO much.  She even used a scale weight instead of a size reference.  Because I'm terrible with size references - when someone says "golf ball size" I can barely figure it out. 

For some strange reason.  I mean - I know how big a golf ball is.

Anyway - on to the buns.  They don't require proofing, but they do need a lot of time for rising.

 
Add flour to a large bowl.

 
Then add the salt.

 
And the sugar.

 
And the yeast.

 
And mix it all up.

 
Then - in a measuring cup, fill to 3/4 cup with hot water.  Add cubed butter and stir until melted.  Make sure the butter is room temperature - it'll melt much more easily.

 
Beat an egg until it's frothy and then add it to the butter-water.  Then add more water (lukewarm).
 
Add the water-egg-butter-mixture to the flour mixture and stir until a dough starts to form.

 
The turn out the dough and knead until it's soft and elastic.
 
Then put the dough into a lightly greased large bowl.  I always just use the one I was doing the mixing in so that I'm not using a bazillion dishes.  

 
Cover and let rise in a warm place until doubled in size.  Now.. For a novice bread-maker, it's important to know this part.  As you know, yeast needs to be warm to activate and grow - making the dough rise. 
 
Yeast is actually kind of gross if you think about it.
 
There are a number of ways to help the dough rise. 
 
You can put it on top of a dryer - dryer running of course (that doesn't work in my house because the laundry room can get quite cold). 
 
You can do the preheated oven method (which I don't really understand because the temperature won't stay consistent and the oven cools off, thereby hindering the rising process.  Unless I read the process wrong?).
 
Or - the way I do it.  Make sure the thermostat in the house is set to no less than 21 degrees and put the dough in a sunny spot.  Not in a window.  I put mine on the kitchen table - the kitchen faces south, so the sun is on the table for a huge majority of the day.
 
And then let rise.  I usually go for 2 hours. 

 
Then it comes to the "formation of the buns" part of the day.
 
Divide the dough into 2 ounce portions.  I like to cut off a portion at a time.  I also like to use my kitchen scale to weigh the portions. 
 
PS - kitchen scale?  Worth every red cent.. Which technically don't exist in Canada anymore.  So...  worth every nickel?  Whatever.  I will always own a kitchen scale.
 
Lay the rounds/buns/boules or whatever on parchment paper on a cookie sheet.  I like to place them so they're just touching a little bit.
 
And yes.  I get 23 out of this batch.  Every.  Single.  Time.  I have no idea why.
 
Let them rise until doubled in size.  I go for 2 hours.

 
And as for finishing.  There are a few different options.
 
First, is a milk wash.
 
Second, is an egg wash (beat and egg with a little milk or water).
 
Third, is melted butter.  I like that one.  Because they don't have enough butter to begin with.
 
Then.  Bake.

 
These buns come out soft, kind of sweet, full of flavor and completely perfect.
 
Every time.
 
Without fail.


I totally love these buns.  They are perfect with lasagna, stew, soup, roasts (with gravy!), and everything in between.
 
I actually shouldn't have been surprised - Darla is amazing and her recipes are always a winner!
 
I totally believe that anyone who isn't sure about making buns that they could do so with this recipe!
 

Tuesday 13 January 2015

Smothered Beef and Bean Burritos

So it's Taco Tuesday again.  But for the love of your sanity you absolutely do not want to have tacos again because if  you do you'll scream and run for the hills while setting fire to every taco shell you can find.
 

Isn't that a delightful run-on sentence?

But seriously.  Aren't you interested in spicing up Taco Tuesday? 

Have burritos instead!  It could beeee.e..........  Burrito Buesday.  Let's just pretend.

And THESE burritos are totally what you should do.

Totally.

 
In a large frying pan, start browning the meat (insert raw meat picture below.  Oh look!)
 
 
Just before the beef is fully cooked through, add the chili powder.
 

Then the cumin.


And the coriander.


And the salt and pepper.
 

Then, once the beef is cooked through, add the refried beans.


Okay - this part is a little weird.  Add in some water.  I know.  I know.  It's weird.  And from one person with food texture issues to another, this completely freaked me out.

Add it anyway. Stir it all together and put it aside.

 
Then you have to make the green Chile sauce - that's the smother part.
 
 
In a medium saucepan, start melting the butter.


Add the flour.

 
Whisk the flour and butter together and cook - this just gets rid of the "raw flour" taste.


Whisk in the chicken broth and cook until thickened.

Add the Chiles and sour cream and stir until combined.


After the meat mixture is cooked and the chile sauce is done, it's time to roll the burritos. 

Divide the meat mixture between 6 tortillas, spreading the meat down the middle of each tortilla.  Put about 2 Tablespoons of cheese on the meat and roll up by folding the sides over and rolling into a burrito shape.
 
To be honest, the recipe says to top with sauce, then top with cheese.  But I think I did it backwards.  I kind of like it that way.  You could always stick the rolled and cheese topped burritos under the boiler for a hot minute to melt the cheese.  Then pour the sauce over the burritos..
 
 
Totally your call.

 
Holy macaroni Batman these burritos were amazing. 
 
I didn't use all the sauce - I was worried about sogginess.  I served what I didn't pour over the top on the side, but it didn't all get used.  You could cut the sauce recipe in half if you wanted to.
 
The filling is tender and has a ton of flavor.  The sauce is creamy and adds a level of decadence that is kind of unexpected.  I totally recommend topping with fresh, crispy lettuce!  And DON'T skimp on the cheese!
 
But I absolutely think you'll love these and should be making them a regular part of your Taco Tuesday rotation!
 
xoxo - Heather